18 June 2011

One room complete

We finished putting the final decorating touches on the main bathroom today which means...drumroll please!...We finally have one room entirely painted, unpacked, decorated and functional! Well, actually, there is still no hot water in the shower, but we are working on that (and we have another shower, so it doesn't seem terribly pressing.)

Here is what the bathroom looked like before. It was very dull and unhappy.


Here's the bathroom after we finished!


Voila! Isn't that just so much better!


We bought this awesome painting above at an auction held at our church to fund missions programs. It was made by our multi-talented 10 year-old friend Caroline. Speaking of Caroline, her dad compiled an amazing book for her. It's a compilation of letters written by women of all generations about what life was like when they were 10 years old. If you're interested in reading it, you can buy it here. I HIGHLY recommend it for yourself or any 10 year-old girl in your life. As a bonus, $2 from every sale will go the Circle of Care ministry for women and children through the United Methodist Church of Oklahoma.

And now, back to the bathroom!


I found these awesome little buckets in the Target One-Spot for $1 each! The shelf was stolen from my mom's house and the picture has been in my possession for years, and never made it to a wall before. I think that the cacti colors really tie-in with the room well. I love the one with the red ball!


I bought this lovely flowers for 25 cents each at the farmers market this morning! I LOVE the farmers market. I also came home with a breakfast burrito and rosemary and basil plants.


The curtain and rug are also from Target.


I'm very happy with how the bathroom turned out! I feel very accomplished now that we have one room ENTIRELY FINISHED!!!! Here's a little sneak peek of a post in my queue right now. I will be telling you how I made ALL of these containers from items in our recycling bin. Stay tuned!

16 June 2011

Itty Bitty Hat

I know I promised a post on the Craft it Forward projects that I have received, but I need to re-take some pictures for that post. Meanwhile, I wanted to give you these quick little pictures.


A couple I know is expecting a little boy any day now, so I made this hat and booties set. This is the second time I have made this hat, but the booties were a new one for me. They were cute, easy, and seamless!

Oh, the best part about this little boy is that his middle name is actually going to be Danger. Isn't that awesome! I'm soooo jealous of him. His life is going to be amazing!

13 June 2011

Craft It Forward 2011: Round 2

Some time ago, I wrote about my Craft it Forward mission that came from a Facebook status which stated:

"Craft it forward 2011. I promise to send something handmade to the FIRST 5 people who leave a comment here. However, to be eligible, you must repost this status, offering the same thing to 5 other people. The rules are that it must be handmade by you and it must be sent to your 5 people sometime in 2011. Here we go!"

I have finished my projects and they have all been sent to their new homes (except one rogue pair of slippers.) I have also received a couple of gifts in return! (That will be the subject of my next post.) The projects below were made mostly out of materials that I already had.


My first endeavor was for my friend Elizabeth after she was discussing her annoyance with her neighbor's yard light, which shined directly into her window at night. She said she slept with a bandanna over her eyes, and I decided she needed something a bit fancier. I free-handed a stencil for this sleeping mask and layered quilt batting between the fun green fabric and some soft satin for the side that lays against the face. I bound it with some bias tape and added an elastic band in a fabric sleeve. It was super-quick!


Next I made two mug cozies for the ladies who work in the church office where I worked during college. I have made this pattern once before. I think it looks really nice, and is easy to memorize. I could probably whip one of these out in about the duration of a movie. (Note: I don't have a link for this pattern, but there is a free download at Ravelry.com. It is listed under "The Mug Snug" by Erica Jackofsky.)


This last project was made for my friend Jenny. A couple of years ago, I knit Jenny some mittens and I still had some of the yarn left over, so I made her a matching hat. I knit the hat exactly as the pattern was stated and the sizing was PERFECT! This is a pattern that I will probably keep in my tool-box for future use when I need a easy hat pronto. The button on here was a spare that came with a sweater of mine.


I am currently putting the finishing touches on another pair of bunny slippers, but I can't tell you who they're for, or it will ruin the surprise if that person reads this!

24 May 2011

A HUGE Project in Motion

I apologize for being so absent from my blog as of late. In my defense, there is one HUGE project in motion right now that has been occupying nearly all of my time.


Ta da! We bought our first house! It's a bit of a fixer-upper, but we are enjoying the challenge. We bought the house at the end of April, and as of this past weekend we are living there *almost* full-time. It still feels a bit like camping, but each day we get a little more settled in. Stay tuned, because as soon as I have a bit of down time and an internet connection at the new place I will have posts about my gardening, painting, carpet-removing, and other new-homeowner adventures.

While you wait, I'll leave you with this.

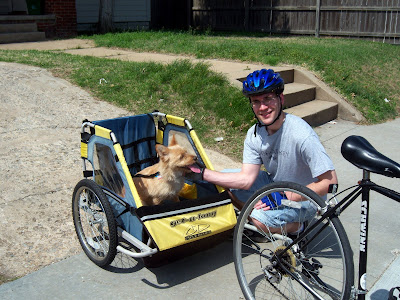
Oliver's new wheels:


Love this little dog. He is just so much fun.

28 April 2011

A Thank You Gift

A few weeks ago we acquired a hand-me-down grill from the guy I share a cubicle with at work. It's very nice and quite large and only needed a little bit of cleaning up. It was very generous of him to give it to us, but honestly, I've been feeling a little guilty that he wouldn't let us give him any money for it. So, in order to assuage my guilt and also for an excuse to knit for a little girl, I decided to make something for his 8 month old daughter.

I've had my eye on this pattern on knitty.com for quite some time now. My old roommate made it once, and I think the baby in the picture is just adorable. Also, I happened to have most of the yarn in my stash already.


I used a variation of the pattern that I found on Ravelry. It was worked in the round to make a dress instead of a pinafore. I still kept the adorable pockets though!


I thought the bodice was looking a little bare, so I made this rose to go along with it. I barely had enough purple. I even had to leave out a few rows.


This button was the first one I saw when I got to the button section of the craft store and the colors were PERFECT!


The dress keeps rolling up at the bottom. I tried steam blocking it after I read a couple of blog posts that said acrylic yarn actually CAN be steam blocked. It helped a little, and it smoothed out the dress nicely, but it still keeps rolling at the bottom. I guess I just need to grow up and start using big girl yarn (i.e. NOT acrylic).


I'm still undecided about these pants. I like them on their own, but I don't love the brown with the dress. I think the brown and orange together look too much like a Girl Scout uniform. I went to four different stores trying to find the right shirt and leggings, and this is the closest I could come. I found the perfect purple leggings at Old Navy, but the only size they had was 3T and I don't feel like ordering them online and waiting for them to come. Also, as a side rant, what's with all the baby clothes having things printed on them? It was SO HARD to find solid colors with no ironic screen printed images or sayings about how much the baby loves < insert family member here >. Seriously, is a plain white onesie with a nice collar so much to ask for?

26 April 2011

The Rainbow Connection

A couple of weekends ago we hosted a grill-out at our house. One of my friends has Celiac disease, so I was trying to think of a fun gluten-free dessert. I decided to make a rainbow jello. I don't have a jello mold, so I just made it in a glass cake pan. The recipe is super easy, but kind of time consuming. The jello needs to be checked on every 15 minutes or so as you are making the layers. It was well worth it though!


So pretty!

Side note: In making this, I learned that my fridge is not level. I also learned that I need a better camera.

11 April 2011

Itty Bitty Shoes

My brother-in-law asked me if I would make a baby gift for him to give a friend who just had a little girl. I, of course, very enthusiastically said yes. I really enjoy making projects for babies. They are usually quick and you get the instant gratification of overwhelming cuteness. It's a win-win situation! The problem is, there are not nearly enough babies in my life. So, I jump at any chance to make something when the opportunity arises.


I knit a hat (pattern:Hospital Hat by Annika Barranti on Ravelry.com) for the baby girl, and at first I was going to knit some booties to match, but then I remembered a free pattern for cloth babies shoes that I had come across one day. It was easy to follow and I DEFINITELY will be making more in the future. In fact there is an Old Ladies' Club meeting scheduled for this week. We will be making vodka infusions and sewing baby shoes. (I feel like there may be something slightly irresponsible about that combination.)

PS- Did you recognize the shoe fabric?

08 April 2011

Stir Fry

Stir fry is one of my favorite dishes to make. It requires no recipe, I just fill it with whatever vegetables I have around at the time. Also, it is so enticing with all of the colors and shapes. The other night, I made tofu stir fry and it was the best that I have made in awhile.


So delicious! I'm excited to start up my garden so I can have home-grown veggies in my stir fry.

20 March 2011

Project Success

Remember that time I failed big time on the project I was working on? Well, if at first you don't succeed, try try again.


I made these counting fish for my nephew's second birthday. I was first inspired by this post, which linked me to this blog (which happens to use the same background as I do.) Because of the small buttons that could potentially pose a choking hazards, they may not be quite suited for his age yet. I think he can still have fun with them with adult supervision, though.

Each of the fishies has a specific number of objects on it from 1 to 10. Then, there is a washer in their nose (do fish have noses?) and a magnet on the end of a string attached to a dowel so that the fish can be "caught." I had to do some embroidery for this project, including blanket stitch around the edges. I was a little intimidated by that, so I put off the final step until late the night before they needed to be finished. I then learned, that blanket stitch is disgustingly easy.


Number 8 is my favorite.


But number 4 is pretty great too.

I do what i can to not-so-subtly encourage the little guy to hone the skills that he will need as an engineer. Hence, the counting game for a two-year-old. I also slipped this puzzle into the package. I picked it up in the Target 1 spot, and added my own labels. Engineering school, here he comes!

16 March 2011

Craft It Forward 2011: Round 1

I have embarked on a special mission: Craft it Forward 2011!
One of my friend's had a facebook status that read, "Craft it forward 2011. I promise to send something handmade to the FIRST 5 people who leave a comment here. However, to be eligible, you must repost this status, offering the same thing to 5 other people. The rules are that it must be handmade by you and it must be sent to your 5 people sometime in 2011. Here we go!"

I'm always up for a good challenge, so I signed myself up! However, my list quickly grew longer than 5 people, because I just couldn't say no to anyone. Also, I signed up with a couple of friends who had posted it as their status, so I decided to make them gifts in return. I've finished about half of the projects I decided to do, and I just mailed them off to their new homes.

Here's what I have made:

I've already shown you one of my projects. For Aunt B, I made the bumblebees from this post.

For my sister Megan, I made pink bunny slippers. The foot of the slipper is based on a traditional "Aunt Maggie" slipper, and then the ears, face, and tail are added to make the bunny. This could be adapted to become any animal, but I thought that that a nice pair of bunny slippers seemed right up Megan's alley! Instead of using two strands of worsted weight yarn like the pattern calls for, I used a single strand of bulky yarn (Lion brand Homespun in "Mixed Berries.") The little pom-pom tails are my favorite part.


I made another pair of slippers for my friend Cathy. I used the bunny pattern again, but I left off the "bunny" parts. For this pair, I used two strands; one was Red Heart Super Saver worsted weight and the other was a soft fluffy yarn I had in my stash. I honestly have no idea what brand it is, or why I bought it. It really softened up the plain-ol' red heart yarn and gave it a unique and fun look! I almost kept them for myself. :)


For my friend Megan, I made two dishcloths. I just love making dishcloths. They're quick, easy, and the perfect way to try out new styles and patterns. I've never made two alike! Years ago, I bought a big bag of cotton yarn at a garage sale, and I've been working my way through it ever since. For Megan, I made one as a diagonal knit (tan) and one in grid pattern (blue).


Shelly got a fuzzy scarf. Since it’s knit in stockinette, it curls up along the edges, which I think makes it look like a snake. The colors and the broad stripes remind me of something that might be worn at Hogwarts, if there was a fifth house with silver and purple as their colors. I started this scarf to use up some excess yarn I had from another project. It was on the needles for over 3 years until I got really motivated and finally finished it this winter. It’s kind of narrow, but super long so that it can be wrapped around the neck several times.


Evan was the only one who didn't get a knit item. Instead, I sewed a retro potholder following this tutorial. I used some fabric crafts from a quilt I made and from little a's tent. This is a really quick sewing project. It took me about an hour and a half, but most of that time was spent cutting out the circles and pressing them into quarters. This project leaves a lot of room for personalization with different fabric and quilting styles. I choose this fabric from my stash for Evan, because they are the colors of our Alma Mater, Iowa State University.

Fun with MS Paint

For your viewing pleasure. :)


The likeness is uncanny, isn't it?

10 March 2011

Little a's Tent

This post is long overdue, as it is about a Christmas present that I made for my nephew. Little a will be turning 2 this weekend. Time sure flies! When I was thinking about what I could make him as a Christmas present, I was reminded of a tent that my babysitter had in the playroom. I loved that tent. I would play in it for hours. It was one of several of my regular forts. I don't know what it is about forts, but the small, dark, and secret space does wonders for the imagination. My husband as well had fond memories of a denim tent that his grandfather had made him. We joined forces on this project. I did the sewing, and Sam did the woodworking.


I couldn't find any free plans online that I really liked for this project, and I couldn't bring myself to pay for any, so I free-handed the whole thing. I looked at a lot of pictures on Etsy to see all of the different ways that people make tents like this. I drew out some dimensions, and set off for the fabric store. I'm going to try to dig up my scrap paper with my notes, and put together a formal tutorial for this. I will likely make more in the future, when I have more nieces, nephews, or children of my own.


The tent body is made from red and blue denim. Denim is a little more difficult to work with than cotton, but I liked how it made the tent nice and dark inside. Either would work though. Next time I make one, I will spend more time scrounging thrift stores. Perhaps I can find some flannel sheets to upcycle.


The most time-consuming part about this project was the detail work, but I think that is what makes it really special. I put in a window, in case it was too dark inside. The windows rolls up or down and is held in place with Velcro. I also decided that I needed to use my newly-discovered skills in applique, so I added little a's name down the side.


BONUS: We got to buy a staple gun to make it! Woo new tools!


As you can see from the pictures, little a was very excited about his new play tent. He even moved his rocking chair inside so he could talk on his phone in privacy. :)

24 February 2011

Project Fail

Sometimes my projects turn out better than expected. Sometimes they don't. See exhibit A below:


I'm not going to tell you what this project was supposed to be, but stay tuned, because I intend to try again! I got a little too eager to work on this project, and the results were sadly quite disappointing. I was trying to do too much too quickly, and I ended up botching the whole thing. The picture above is supposed to be a fish. He didn't turn out very fish-like (technical term) so I tried to help him by outlining in zig-zag stitch. It was well intentioned, but it just made matters worse. In the end, I cut the fish open and sewed in a squeaker that was salvaged from another doggie toy, and Oliver got a new little friend to play with. He was so excited that I couldn't get a decent picture of him. The fish lasted all of about 15 minutes. Now, he is swimming with the fishes, so to speak.


After the blue fish, I also destroyed a yellow one. The rainbow-striped fish was the only one that actually turned out pretty well, but then I realized there was a hole in the fabric. Sigh. I hear my fifth grade teacher's voice in my head right about now, "Haste makes waste."

I think I'll call it a night and hope for better luck tomorrow.